In this post we’ll create link aggregation that look like Hacker News.
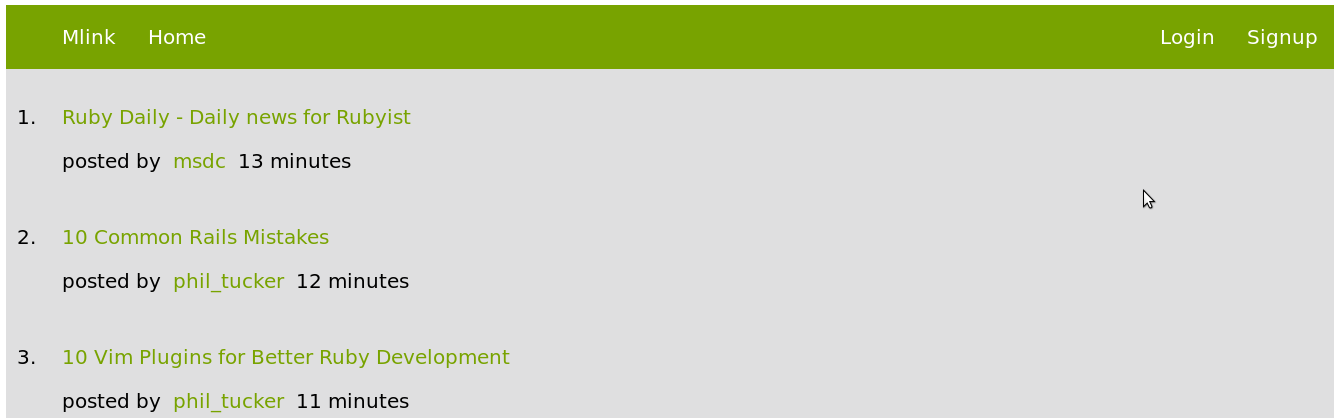
Here’s how it’ll be look like:
In this tutorial we’ll cover:
- Design our page with HTML, CSS
- Creating authentication with Devise
- How to create, edit and delete links
- How to show link user and time when post was submitted.
Design our page
Before we start to add real code, we’ll start with html and css. First create application named mlink.
rails new mlinkWe’ll start with designing how our page will be look like. Add slim gem to your Gemfile
Gemfile
gem 'slim-rails'Slim is template language, that strips HTML from unecessary tags.
Here’s how look like code in HTML
<html>
  <head>
    <title>My Webpage</title>
  </head>
  <body>
    <h1>My heading</h1>
    <p>My paragraph</p>
  </body>
</html>
And this how look like code in Slim:
html
  head
    title My Webpage
  body
    h1 My Heading
    p My paragraph
Simpler isn’t it? Slim strips HTML from all opening and closing tags. Slim uses two spaces indentation after every parent element. For example element html has two children body and head. In Slim you can use Ruby part of Ruby code.
Creating navigation
We’ll start with basic navigation, wewant to show things related to links on left side and authentication on right side. Create controller named home
rails generate controller home homeIf you look at app/views folder you should see that we’ve just createdfolder with name home and you should see file home.html.slim inside it.
Let’s take a look at the code at the browser:
rails serverIt works, but typing whole path to address bar in browser can be really disgusting. Let’s fix it.
config/routes.rb
root 'home#home'Here we’ve changed root path. So if you look at this at the browser, you should see that we don’t have to type address to addressbar anymore.
Creating navigation
First thing we want to do is to create navigation, but we want to use it on every page so we need to modify our layout. If you have application.html.erb in your layouts folder replace it with following file:
app/views/layouts/application.html.slim
doctype html
html
  head
    title Mlink
    = stylesheet_link_tag    "application", media: "all", "data-turbolinks-track" => true
    = javascript_include_tag "application", "data-turbolinks-track" => true
    = csrf_meta_tags
  body
    div#wrapper
      = render 'layouts/header'
      = yield
If you scroll down to the code, you certainly noticed two methods, first is render. Render is used when you don’t want to have all the code in one file and want to use it in other file. Method will look at the partial with name _header.html.slim in layouts folder.
Another method is yield. Yield is used to include anything related to page right after to header.
So now you know why to use partials, let’s create partial _header.html.slim
app/views/layouts/_header.html.slim
header.navbar
  ul.links
    li = link_to "Mlink, '#'
    li = link_to "Home", '#'
    li = link_to "Submit", '#'
  ul.auth
    li = link_to "Login", '#'
    li = link_to "Signup", '#'
Take look at the code that we’ve just done.
header.navbar
  ul.links
Slim use shortcuts for creating html elements. So here, you’ve used this:
header.navbarinstead of:
<header class="navbar">You certainly noticed we’ve used link_to. Link_to is special rails method for links.
Let’s add some styling for our navigation. Create file main.css.scss
app/assets/stylesheets/main.css.scss
.navbar {
  background-color: rgb(120, 163, 0);
  width: 100%;
  overflow: hidden;

  ul {
    list-style: none;

    li {
      display:inline;
      padding: 0.8em;

      a {
        text-decoration: none;
        color: white;
      }
    }
  }
}

.links {
  float: left;
}

.auth {
  float: right;
}
Here we’ve added green background to our navigation, add some place between elements and
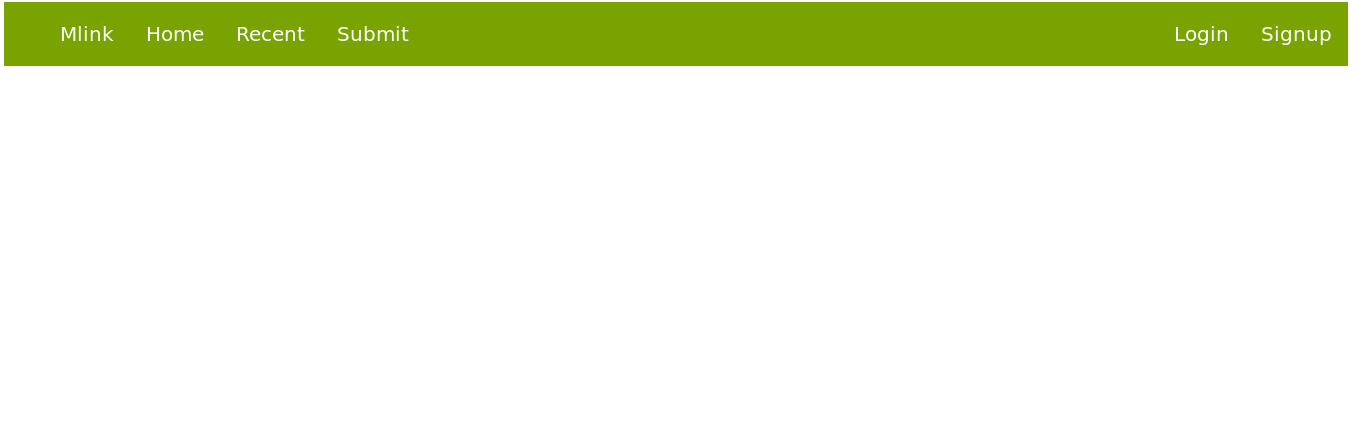
Ok let’s run rails server to see whatwe’ve created. We’ll end up with menu like this:
Design main content of page
Let’s design content our webpage. We want to show links that users submitted on homepage, so add this to file home.html.slim
app/views/home/home.html.slim
section#content
  ol#links-list
    li
      span.link
        = link_to "Geeklist", '#'
      span.details
        p
          | posted by
          = link_to "ed_wood", '#'
          | 20 minutes ago
And styling to main.css.scss
app/assets/stylesheets/main.css.scss
#wrapper {
  background-color: rgb(223, 223, 224);
  }

.details a {
  padding: 0.6em;
}

#links-list li {
  padding: 0.8em;
  a {
    color: rgb(120, 163, 0);
  }
}
So we’ve just added how links will be look like.
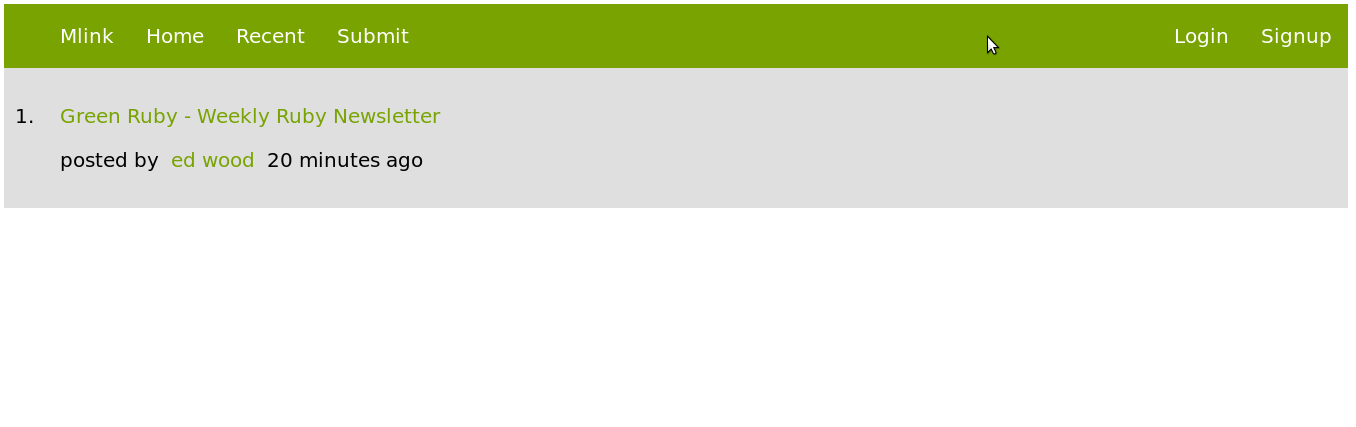
Your homepage should look like this:
We’ve just designed our home page let’s move to creating authentication.
Creating Authentication with Devise
For authentication we’ll use devise authentication system.
Add Devise gem to your Gemfile
gem 'devise'And install it.
bundle installRun following command to setup Devise
rails generate devise:installTo work, we need to add model devise user to database.
rails generate devise user
rake db:migrate
Now we have to add authentication links to our homepage. Add this code to _header.html.slim
app/views/layouts/_header.html.slim
header.navbar
ul.links
li = link_to "Mlink", '#'
li = link_to "Home", root_path
li = link_to "Submit", '#'
ul.auth
- if user_signed_in?
li = link_to 'Edit profile', edit_user_registration_path
li = link_to 'Logout', destroy_user_session_path
- else
li = link_to 'Login', new_user_session_path
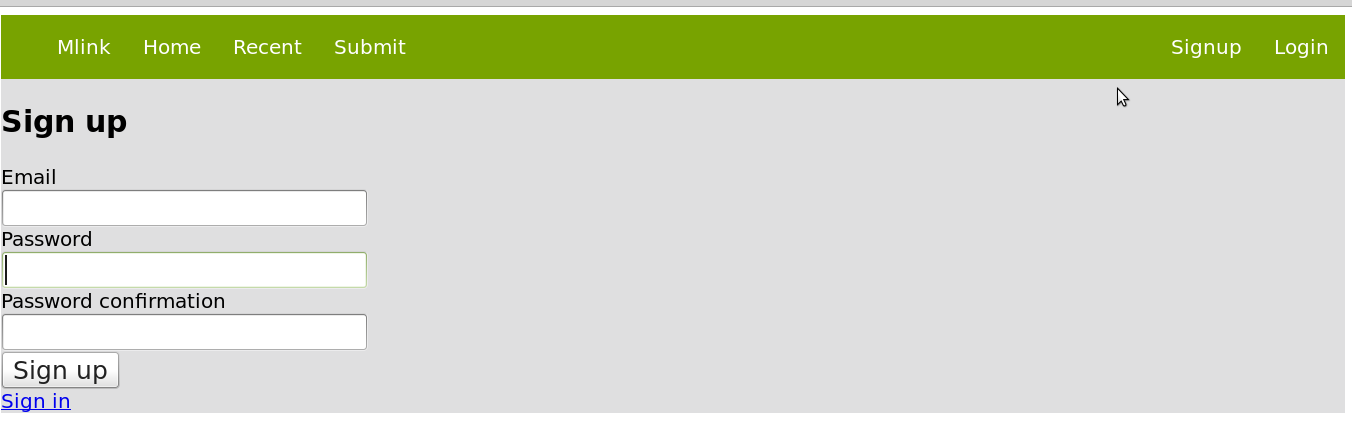
li = link_to 'Signup', new_user_registration_pathRestart your rails server and after you click on Signup link you should see this form:
Creating, editing, deleting links
We’ve just added authentication. We need to create controller named links
rails generate controller linksWe need to add links values to database, so we need to generate this model.
rails generate model Link title:string url:string user:references
rake db:migrate
Previous command will generate
Here we’ve created link attributes. Every link has title and url, and of course user id related to link url.
rake db:migrateAdd path do config/routes.rb
resources :linksResources will create all path
Now we can add path to controller. We’ll add create, update and destroy.
app/controllers/links_controller.rb
def new
end

def create
end

def update
end

def destroy
end
Creating links
Now we’ll create form for creating links. Add /links/new path to _header.html.slim
- if user_signed_in
  li = link_to "Submit", 'links/new'
We have added user_signed which is helper that Devise provides to check if user has signed_in and if he has signed in we’ll show him link to submit form.
Let’s create form for our links, to simplify it add simple_form gem to your Gemfile.
Gemfile
gem 'simple_form'And configure it.
rails generate simple_form:installLet’s create form for submitting our links. We’ll put form in a partial _form.html.slim
app/views/links/_form.html.slim
= simple_form_for @link do |f|
  = f.input :title
  = f.input :url
  = f.button :submit
Simple form will generate basic html form.
app/views/links/new.html.slim
h1 Submit a Link

= render 'form'
Just add little styling to your forms
app/assets/stylesheets/forms.css.scss
.simple_form {
  div.input {
    margin-bottom: 30px;
    clear: both;
  }
  label {
    float: left;
    width: 200px;
    text-align: right;
    margin: 2px 10px;
  }
}
We need to connect user model with link model
app/models/user.rb
has_many :linksAnd we validate in our model that our links form can’t be blank.
app/models/link.rb
belongs_to :user
validates :title, presence: true
validates :url, presence: true
app/controllers/links_controller.rb
def create
  @user = current_user
  @link = @user.links.new(link_params)
  if @link.save
    redirect_to root_path
  else
    render 'new'
  end
end

  private
    def link_params
      params.require(:link).permit(:title, :url)
    end
end
We want to our links to show on home page so add this code to home controller.
def home
  @links = Link.all
And add some code to home.html.slim
section#content
  ol#links-list
    - @links.each do |link|
      li
        span.link
          = link_to link.title, link.url
        span.details
          - if link.user == current_user
            = link_to 'edit', edit_link_path(link)
            = link_to "delete", link_path(link), method: :delete
Editing links
We want to user to edit his links that he submitted, so we’ll add update action to links_controller
app/controllers/links_controller.rb
def edit
  @link = Link.find(params[:id])
end

def update
  @link = Link.find(params[:id])

  if @link.update(link_params)
    redirect_to root_path
  else
    render 'edit'
  end
end
Here we’ve find link by it’s id and check out if link was submitted by current signed user, if it was we allow updating it.
Deleting links
To delete links add destroy action to links_controller
def destroy
  @link = Link.find(params[:id])
  if @link.user == current_user
    @link.destroy
    redirect_to root_path
  end
end
Showing link’s user and when it was submitted.
We want to show which user submittted link and time when it was posted.
Right now we’re using user’s email to login, but we want to show username with link. We need to edit Devise to fix that.
Adding username to authentication in Devise
To add username to Devise based authentication follow instruction on devise wiki
If you followed instruction on Devise wiki, you can add link’s user and time when it was submitted.
Add this code to home.html.slim
app/views/home/home.html.slim
section#content
  ol#links-list
    - @links.each do |link|
      li
        span.link
          = link_to link.title, link.url
        span.details
          - if link.user == current_user
            = link_to "edit", edit_link_path(link)
            = link_to "delete", link_path(link), method: :delete

          p
            |
            posted by
            = link_to link.user.username
            = time_ago_in_words(link.created_at)
So that’s all for now. Next time we’ll add some comments to our links aggregation site.