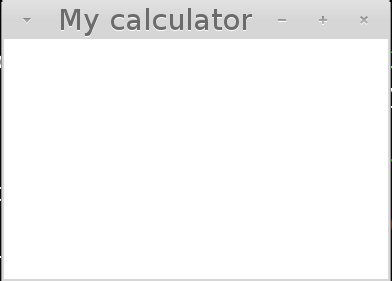
In this tutorial you will learn how to create simple calculator in Ruby GUI toolkit Shoes that looks like this:
 </img>
Because original Shoes is outdated and new Shoes 4 isn’t released yet, we’ll use Green Shoes in this tutorial.
How to install Shoes
Before you can install green_shoes you have to install ruby. I’ve included instructions about how to install ruby in previous post.
If you have ruby installed by rvm, just install green_shoes with rubygems:
$ gem install green_shoesIf you have trouble with installation, you have to install ruby gtk2.
Running shoes
To run we need to add green_shoes gem to our ruby file.
Go to your favorite text editor, create new file calculator.rb and type this code:
calculator.rb
require 'green_shoes'
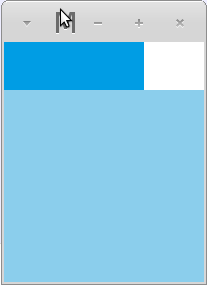
Shoes.app(title: "My calculator", width: 200, height: 240) do
endGo to the terminal and run green shoes:
ruby calculator.rbYou should see something like this:
 </img>
Adding basic template for app
Let’s add template for our calculator. We need to add place for number field, clear button and remaining buttons.
require 'green_shoes'

Shoes.app(title: "My calculator", width: 200, height: 240) do
  flow width: 200, height: 240 do
    flow width: 0.7, height: 0.2 do
      background rgb(0, 157, 228)
    end

    flow width: 0.3, height: 0.2 do
    end

    flow width: 1.0, height: 0.8 do
      background rgb(139, 206, 236)
    end
  end
end
If you run shoes again, you should see something like this:
 </img>
Let’s look at what we’ve done. First we’ve created flow, that copy size of screen.
flow width: 200, height: 240 doOur app is divided into three parts: number field, clear button and remaining buttons, so we’ve created three different flows to match it.
flow width: 0.7, height: 0.2 do
  background rgb(0, 157, 228)
end
Here we used floating points to match size of flow. If you type 0.7 it means 70% width of screen and if you type 0.2 it means 20% size. Then we’ve used background method to change color of the flow.
Ok we’ve done with preparations, let’s create some buttons.
Adding calculator buttons
First we need to add number field:
require 'green_shoes'
Shoes.app(title: "My calculator", width: 200, height: 240) do
number_field = nil
@number = 0
flow width: 200, height: 240 do
flow width: 0.7, height: 0.2 do
background rgb(0, 157, 228)
number_field = para @number, margin: 10
end
flow width: 0.3, height: 0.2 do
end
flow width: 1.0, height: 0.8 do
background rgb(139, 206, 236)
end
end
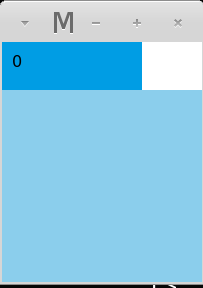
endSo if you run code you should number 0 in number field:
 </img>
Let’s take a look at code:
number_field = nil
  @number = 0
Here we’ve set two variables. Variable number_field is for displaying number field. In variable @number we set actual value of number in the number field.
number_field = para @number, margin: 10Here we’ve changed number field to para. Para is method in shoes for displaying text or numbers in screen. We’ve used @number to set para to 0, but it can be anything you like. After that we’ve set margin to all sizes.
Adding Clr Button
Now we have to add clr button. To add button type something like this:
require 'green_shoes'
Shoes.app(title: "My calculator", width: 200, height: 240) do
number_field = nil
@number = 0
flow width: 200, height: 240 do
flow width: 0.7, height: 0.2 do
background rgb(0, 157, 228)
number_field = para @number, margin: 10
end
flow width: 0.3, height: 0.2 do
button 'Clr', width: 1.0, height: 1.0 do
end
end
flow width: 1.0, height: 0.8 do
background rgb(139, 206, 236)
end
end
end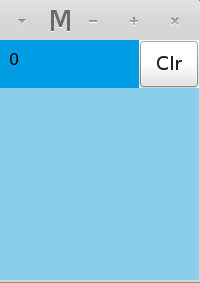 </img>
button 'Clr', width: 1.0, height: 1.0 do
end
So here we’ve added button with name Clr and set it’s width and height to size of flow.
Adding remaining buttons
We need to add all buttons what we need. Add this code into your app.
require 'green_shoes'

Shoes.app(title: "My calculator", width: 200, height: 240) do
  number_field = nil
  @number = 0
  flow width: 200, height: 240 do
    flow width: 0.7, height: 0.2 do
      background rgb(0, 157, 228)
      number_field = para @number, margin: 10
    end

    flow width: 0.3, height: 0.2 do
      button 'Clr', width: 1.0, height: 1.0 do
      end
    end

    flow width: 1.0, height: 0.8 do
      background rgb(139, 206, 236)
      %w(7 8 9 + 4 5 6 - 1 2 3 / 0 . = *).each do |btn|
        button btn, width: 50, height: 50 do
        end
      end
    end
  end
end
</img>
%w(7 8 9 + 4 5 6 - 1 2 3 / 0 . = *).each do |btn|
  button btn, width: 50, height: 50 do
  end
We’ve added all buttons to array with %w method and added every button to each loop, then we’ve set height and width of the buttons.
Running Buttons
So our buttons are now displayed, but if you click at them they don’t work. Let’s fix it. Go to flow with clr button and add code some code:
require 'green_shoes'

Shoes.app(title: "My calculator", width: 200, height: 240) do
  number_field = nil
  @number = 0
  flow width: 200, height: 240 do
    flow width: 0.7, height: 0.2 do
      background rgb(0, 157, 228)
      number_field = para @number, margin: 10
    end

    flow width: 0.3, height: 0.2 do
      button 'Clr', width: 1.0, height: 1.0 do
        @number = 0
        number_field.replace(@number)
      end
    end

    flow width: 1.0, height: 0.8 do
      background rgb(139, 206, 236)
      %w(7 8 9 + 4 5 6 - 1 2 3 / 0 . = *).each do |btn|
        button btn, width: 50, height: 50 do
        end
      end
    end
  end
end
@number = 0
number_field.replace(@number)Here we’ve added block of code to button, that every time button Clr is pressed variable @number is set to 0. Then we use special ruby method replace to change actual value of number_field to 0. Maybe it doesn’t seems to work, but try change value of variable @number to any other number and then press clr. It should change to zero.
Ok we’ve added functionality to Clr button let’s move on numbers:
require 'green_shoes'
Shoes.app(title: "My calculator", width: 200, height: 240) do
number_field = nil
@number = 0
flow width: 200, height: 240 do
flow width: 0.7, height: 0.2 do
background rgb(0, 157, 228)
number_field = para @number, margin: 10
end
flow width: 0.3, height: 0.2 do
button 'Clr', width: 1.0, height: 1.0 do
@number = 0
number_field.replace(@number)
end
end
flow width: 1.0, height: 0.8 do
background rgb(139, 206, 236)
%w(7 8 9 + 4 5 6 - 1 2 3 / 0 . = *).each do |btn|
button btn, width: 50, height: 50 do
case btn
  when /[0-9]/
    @number = @number.to_i * 10 + btn.to_i
end
number_field.replace(@number)
end
end
end
end
endIf you try your calculator in shoes, you should be able to use numbers.
case btn
when /[0-9]/
@number = @number.to_i * 10 + btn.to_i
end
number_field.replace(@number)Here we used case statement with when to catch clicks on numbers. We’ve replaced value of variable @number with value of our buttons.
Adding operations
We have working number buttons, but what to do with operators.
require 'green_shoes'

Shoes.app(title: "My calculator", width: 200, height: 240) do
  number_field = nil
  @number = 0
  @op = nil
  @previous = 0

  flow width: 200, height: 240 do
    flow width: 0.7, height: 0.2 do
      background rgb(0, 157, 228)
      number_field = para @number, margin: 10
    end

    flow width: 0.3, height: 0.2 do
      button 'Clr', width: 1.0, height: 1.0 do
        @number = 0
        number_field.replace(@number)
      end
    end

    flow width: 1.0, height: 0.8 do
      background rgb(139, 206, 236)
      %w(7 8 9 + 4 5 6 - 1 2 3 / 0 . = *).each do |btn|
        button btn, width: 50, height: 50 do
          case btn
            when /[0-9]/
              @number = @number.to_i * 10 + btn.to_i

            when '='
              @number = @previous.send(@op, @number)
            else
              @previous, @number = @number, nil
              @op = btn
          end
          number_field.replace(@number)
        end
      end
    end
  end
end
@op = nil
@previous = 0First we need to add two variables, @previous and @op right after variable @number. We’ll use @op for actual operations and previous to catch previous number.
when '='
  @number = @previous.send(@op, @number)
else
  @previous, @number = @number, nil
  @op = btn
We’ve set value of @op to our operator buttons and save value of actual number to variable @previous. Then we’ve used ruby send method, that when equals button is pressed, it calculate expressions for us.
We’re done with our calculator. See you next time.